לימוד ארדואינו : שיעור 16 – מוסיקה ארדואינו ,שימוש ב ()while – קורס c506
שימוש בפונקציה tone מאפשר לנו ליצור צליל בתדר משתנה ,ובכך ליצור מנגנה במיקרובקר ארדואינו .
על מנת להפסיק את הצליי נשמתש בפקודה noTone
tone()
Description
Generates a square wave of the specified frequency (and 50% duty cycle) on a pin. A duration can be specified, otherwise the wave continues until a call to noTone(). The pin can be connected to a piezo buzzer or other speaker to play tones.
Only one tone can be generated at a time. If a tone is already playing on a different pin, the call to tone() will have no effect. If the tone is playing on the same pin, the call will set its frequency.
Use of the tone() function will interfere with PWM output on pins 3 and 11 (on boards other than the Mega).
It is not possible to generate tones lower than 31Hz. For technical details, see Brett Hagman’s notes.
Syntax
tone(pin, frequency)
tone(pin, frequency, duration)
דוגמא 1 : הפקת צליל
//  www.robotronix.co.il
// רובוטרוניקס קורס C506
// שיעור 16 - צללים טונים


#define   speaker  5
const int Led3  =  2;


void setup() {
  pinMode(speaker, OUTPUT);


   tone(speaker, 261,1000); // DO
   delay(300);
   noTone(speaker); // Stop sound


   delay(100);
   tone(speaker, 293); // RE
   delay(300);
   noTone(speaker); // Stop sound

   delay(100);
   tone(speaker, 329,1000); // ME
   delay(300);
   noTone(speaker); // Stop sound

   delay(100);
   tone(speaker, 349,1000); // FA
   delay(300);
   noTone(speaker); // Stop sound

   delay(100);
   tone(speaker, 392,1000); // SOL
   delay(300);
   noTone(speaker); // Stop sound

   delay(100);
   tone(speaker, 440,1000); // LA
   delay(300);
   noTone(speaker); // Stop sound

   delay(100);
   tone(speaker, 493,1000); // SI
   delay(300);
   noTone(speaker); // Stop sound

}

void loop() {
}
דוגמא 2 : ניגון יונתן הקטן ולימוד While
//  www.robotronix.co.il
// רובוטרוניקס קורס C506
// שיעור 16 - צללים טונים


#define   speaker  5
const int Led3  =  2;
#define EndOfMusic=-1;

#define DO  261
#define RE  293
#define ME  329
#define FA  349
#define SOL 392
#define LA  440
#define SI  493

int Song1[2][100];
int StackIndex=0;

void play(int frequency, int duration)
{
   digitalWrite(3, HIGH);
    tone(speaker, frequency); // RE
    delay(duration);
    noTone(speaker); // Stop sound
   digitalWrite(3, LOW);
    delay(250);

}

void push(int frequency, int duration)
{
 Song1[0][StackIndex] =frequency;
 Song1[1][StackIndex] =duration;
StackIndex++;
}

void setup() {
int i=0;
  pinMode(speaker, OUTPUT);
  pinMode(3, OUTPUT);
  // load melody to array
 Song1[0][0] =SOL;
 Song1[1][0]=500;

 Song1[0][1] =ME;
 Song1[1][1]=500;

 Song1[0][2] =ME;
 Song1[1][2]= 1000;

Song1[0][3] =FA;
 Song1[1][3]=500;

 Song1[0][4] =RE;
 Song1[1][4]=500;

 Song1[0][5] =RE;
 Song1[1][5]= 1000;


 Song1[0][6] =DO;
 Song1[1][6]= 500;


  Song1[0][7] =RE;
 Song1[1][7]= 500;


  Song1[0][8] =ME;
  Song1[1][8]= 500;

  Song1[0][9] =FA;
  Song1[1][9]= 500;

  Song1[0][10] =SOL;
  Song1[1][10]= 500;

  Song1[0][11] =SOL;
  Song1[1][11]= 500;

  Song1[0][12] =SOL;
  Song1[1][12]= 500;


 Song1[0][13] =-1;


while (Song1[0][i]!=-1)
{
 play( Song1[0][i] ,Song1[1][i]);
 i++; // i=i+1
}


}

void loop() {
}
דוגמא 3 : שימוש ב PUSH – מה זה STACK לניגון שיר
//  www.robotronix.co.il
// רובוטרוניקס קורס C506// שיעור 16 - צללים טונים


#define   speaker  5
const int Led1  =  3;#define EndOfMusic=-1;

#define DO  261
#define RE  293
#define ME  329
#define FA  349
#define SOL 392
#define LA  440
#define SI  493

int Song1[2][100];
int StackIndex=0;

void play(int frequency, int duration)
{
   digitalWrite(Led1, HIGH);
    tone(speaker, frequency); // RE
    delay(duration);
    noTone(speaker); // Stop sound
   digitalWrite(Led1, LOW);
    delay(250);

}

void push(int frequency, int duration)
{
 Song1[0][StackIndex] =frequency;
 Song1[1][StackIndex] =duration;
StackIndex++;
}

void setup() {
int i=0;
  pinMode(speaker, OUTPUT);
  pinMode(Led1, OUTPUT);
  // load melody to array

 push(SOL,500);
 push(ME,500);
 push(ME,1000);
 push(FA,500);
 push(RE,500);
 push(RE,1000);
 push(DO,500);
 push(RE,500);
 push(ME,500);
 push(FA,500);
 push(SOL,500);
 push(SOL,500);
 push(SOL,1000);

 push(EndOfMusic,0); // EndOfMusic = -1


while (Song1[0][i]!=EndOfMusic) // EndOfMusic =-1
{
 play( Song1[0][i] ,Song1[1][i]);
 i++; // i=i+1
}


}

void loop() {
}
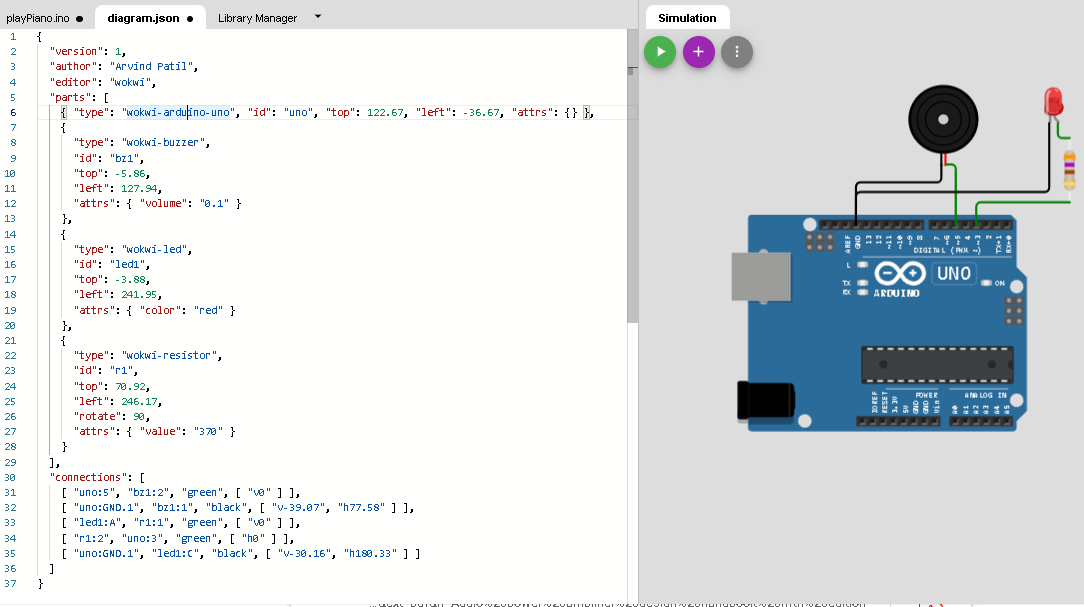
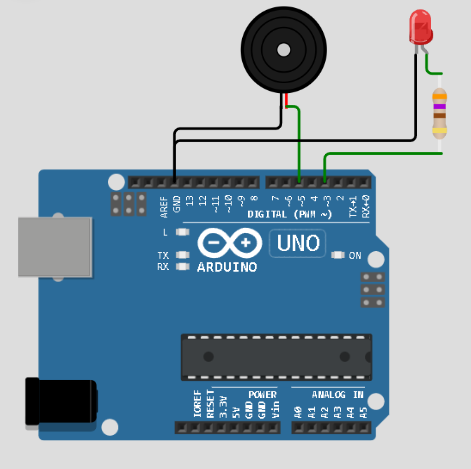
סקובץ הסכמה האלקטורני diagram.json
{
  "version": 1,
  "author": "Arvind Patil",
  "editor": "wokwi",
  "parts": [
    { "type": "wokwi-arduino-uno", "id": "uno", "top": 122.67, "left": -36.67, "attrs": {} },
    {
      "type": "wokwi-buzzer",
      "id": "bz1",
      "top": -5.86,
      "left": 127.94,
      "attrs": { "volume": "0.1" }
    },
    {
      "type": "wokwi-led",
      "id": "led1",
      "top": -3.88,
      "left": 241.95,
      "attrs": { "color": "red" }
    },
    {
      "type": "wokwi-resistor",
      "id": "r1",
      "top": 70.92,
      "left": 246.17,
      "rotate": 90,
      "attrs": { "value": "370" }
    }
  ],
  "connections": [
    [ "uno:5", "bz1:2", "green", [ "v0" ] ],
    [ "uno:GND.1", "bz1:1", "black", [ "v-39.07", "h77.58" ] ],
    [ "led1:A", "r1:1", "green", [ "v0" ] ],
    [ "r1:2", "uno:3", "green", [ "h0" ] ],
    [ "uno:GND.1", "led1:C", "black", [ "v-30.16", "h180.33" ] ]
  ]
}